
Details
Running an event? Why not setup an automation to trigger X days or hours (or even minutes) before the event starts, to remind your contacts and provide venue details or webinar links and so on.
This guide will work you through the process of setting this up manually through an automation - but we also have some automated solutions available, as mentioned below.
Quickly create a structured series of pre-event email & SMS messages with our built-in Event Automations - Automatically Create an Event Reminder Series From an Event.
If you run a lot of events, build event automations or use the API to send event emails, you may be interested in our special wildcard event email template.
Which Automation Type To Use
This automation can be setup using both our Basic or Advanced Automation feature. However, using an Advanced Automation will offer more options & flexibility for filtering & timing of the trigger.
- With a Basic Automation, you can trigger off almost any date & time field on your list, or a date & time field attached to an Event.
- With an Advanced Automation, you can trigger off a date & time field on your list, as well as an arbitrary date & time (not related to any field).
Advanced Automations are only available on our Pro-Marketer plan.
What This Example Will Cover
In this guide, we'll run through several different automation examples (both Basic & Advanced) - so you can choose the one that best suits your needs.
- Example 1: A basic automation that uses an arbitrary date & time field on your list. We'll setup the reminder to send 1 hour before the time stored in that field.
- Example 2: An advanced automation that uses a date & time field on your list, but triggers with a delay against that field. We'll setup the reminder to send 1 hour before the time stored in the aforementioned field.
- Example 3: An advanced automation that triggers at a certain date and time - not linked to any field or event. Just triggering at your chosen date & time.
How-to Guide
Example 1: Basic Automation (Using an Date & Time Field on Your List)
- Select Automations from the sidebar.
- Click .
- Next to the Create your own automation option, select .
- In the first section, select the trigger as A period on, before or after a date and time.

- In the second section, leave the options unchecked and instead select the list & corresponding date field to use for your automation.

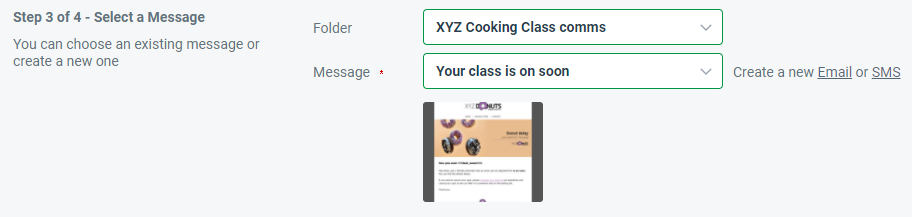
- In the third section, use the dropdowns to select the message (email or SMS) you'd like to send as part of the automation.
- In the fourth section, select the timing of the send. For example, 30 minutes before.

- When finished, click . The automation will now trigger when applicable.
Example 2: Advanced Automation (Trigger With a Time Delay Against a Date & Time Field)
- Select Automation from the sidebar.
- Select the Advanced Automation tab.
- Click .
- Give the workflow a name and click .
- Click .
- In the first section, set the action as A trigger against the following List and select the list in question.
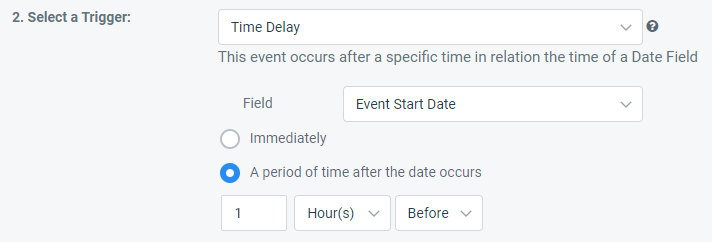
- In the second section, set the trigger as Time Delay, then choose your date field from the dropdown underneath.
- Now select A period of time after the date occurs and choose the timing. For example, 1 hour before.
- In the third section, use the dropdowns to select the message (email or SMS) you'd like to send as part of the automation.
- When finished, click . Click again to return to the automation overview screen.
- Finally, click next to the automation and choose Activate. Your automation will now trigger at the desired timing.
Example 3: Advanced Automation (Trigger at Your Chosen Date & Time)
- Select Automation from the sidebar.
- Select the Advanced Automation tab.
- Click .
- Give the workflow a name and click .
- Click .
- In the first section, set the action as A trigger against the following List and select the list in question.
- In the second section, set the trigger as Subscribe.
- In the third section, use the dropdowns to select the message (email or SMS) you'd like to send as part of the automation.
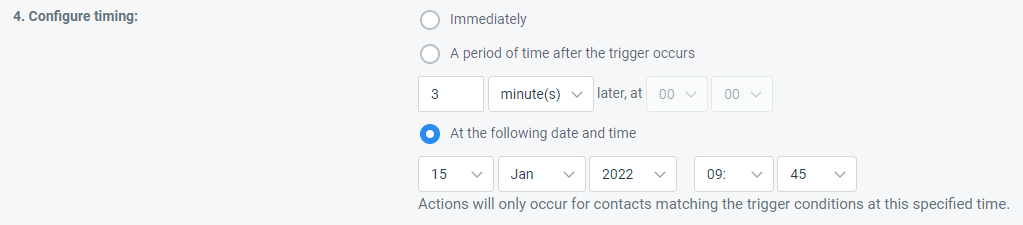
- In the forth section, select At the following date and time and set this as required.
- When finished, click . Click again to return to the automation overview screen.
- Finally, click next to the automation and choose Activate. Your automation will now trigger at the desired timing.